
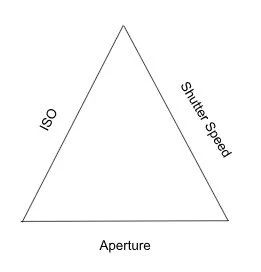
The Exposure Triangle
Welcome,
The exposure triangle is one of the most fundamental things to understand in photography. First of all, If you’re just learning — thank you for entrusting me with such a vital period in your learning process. If you’ve been practicing photography for a while, I ensure you that revisiting the exposure triangle will help you refine your capabilities.
Secondly, by learning how to shoot fully manual you are essentially learning to understand your camera far better. This will further enable you to do great things.
Intro
ISO, Shutter Speed, and Aperture are the three settings you will use to create properly exposed images.
ISO
Represented as a number, this is the sensitivity of your camera sensor to light. If this number increases, and nothing else in your exposure triangle changes, your exposure will increase.
*Tip - Remember as ISO increases the amount of noise in your photo increases.
Aperture
Aperture is represented as a number or decimal. Aperture dictates how large or small the opening of your lens is. A lower aperture will let more light in and give you a shallower depth of field. A higher aperture will let less light in and give you a deeper depth of field.
Aperture dictates your depth of field, which is how much of your image is in focus.
With a lower aperture you’ll have a shallow depth of field. In which you can focus in on a subject and the background will be blurred.
With a higher aperture you’ll have a deep depth of field. In which the more of image will be in focus.
Shutter Speed
Represented as a fraction or number, this is the speed at which your shutter closes. If this number increases, and nothing else in your exposure triangle changes, your exposure will increase.
For example, if your shutter speed is 1/400 it stands for 1/400th of a second. Your shutter will remain open for that period of time, and take in any light during that time essentially freezing what is in the frame.
If you increase the amount of time your shutter is open to say, 1 whole second, not only will it increase your exposure by a lot. It will also create a blurring effect. This is how smooth water effects, and blurred motion pictures are created.
To summarize, you want a short shutter speed to freeze what is in the frame. You want a long shutter speed to blur what is in the frame.
Stop!s of Light
Now that we have a basic understanding of the 3 sides of the exposure triangle, let’s explore how they work together.
*The exposure triangle is an equilateral triangle for a reason. If you want to maintain the same exposure you are set to, you will have to compensate with either one of the other settings, or both of the other settings. This is the essence of the exposure triangle. A change to aperture will warrant a change to either ISO or Shutter Speed, or a combination of both, in order to maintain the same exposure.
_______________________________________________________________________________________________________
Light is measured in stops. A stop means either doubling or halving the amount of light you allow to hit your sensor. So if you increase your exposure by one stop, you are doubling the amount of light you allow to hit your sensor.
This is achieved one of three ways.
Using ISO, Aperture, or Shutter Speed you can achieve changes in stops of light!
To increase your exposure by one stop using ISO, double the ISO’s value. So, if your ISO was previously 200, you would set it to 400.
To increase your exposure by one stop using Aperture, you would lower the aperture value. So, if your aperture was at 2, you would decrease the aperture to 1.4. *In aperture lower values are actually bigger holes. When setting aperture consider what depth of field you want and build your triangle from there.
To increase your exposure by one stop using Shutter Speed, you would increase your shutter speed by doubling it. So, if you were shooting at shutter speed 1/400th of a second, you would then increase your shutter speed to 1/200th of a second.
Now that you know how to increase exposure by one stop, I trust that you will understand that to decrease exposure by one stop, you will simply do the steps I explained above — inversely.
The Exposure Triangle In Action
With proper basics, you increase your potential in anything. So, practice and know the exposure triangle forwards and back if you want to become a great photographer.
Now… let’s put this knowledge into action. I will first lay out a few scenarios; then I will leave a few scenarios blank for you to complete on your own.
You’re shooting street photography, and it’s an overcast day. You see a bird perched on a high building and you want to drop the exposure by 3 stops to properly expose for the sky.
Your Current Settings:
ISO: 100
Aperture: 2.8
Shutter Speed: 1/400
New Settings:
ISO: 100
Aperture: 2.8
Shutter Speed: 1/3200 (doubled 3 times to decrease exposure by 3 stops of light.)
There are other possible ways to achieve this, but this is my most likely change in the field. Which prompts me to use my aperture settings more.
You’re shooting inside for an event, and all of the main lighting has gone off for a special part of the show. You need to increase your exposure by 2 stops.
Your Current Settings:
ISO: 800
Aperture: 2.8
Shutter Speed: 1/200
New Settings:
ISO: 1600 (doubled to increase exposure by 1 stop)
Aperture: 2 (decreased to increase exposure by 1 stop)
Shutter Speed: 1/200
Increased exposure using 2 separate settings to avoid increasing ISO by too much, we then dropped our aperture to accommodate.
You’re shooting portraits at an event and have only been taking single person photos, but a bunch of friends ran over and want to take a group picture!
Current Settings:
ISO: 100
Aperture: 1.4
Shutter Speed: 1/200
New Settings:
ISO: 100
Aperture: 4 (Decreased exposure by 3 stops to increase depth of field)
Shutter: 1/50 (Increased by 3 stops to balance out the increase in aperture)
Balance. Sometimes you have a desired look, or what you’re shooting requires something like a faster shutter speed, or deeper depth of field and this is when your understanding of the exposure triangle will come in handy.
1.) You’re shooting street photography, and there is a sunbreak. The ambient light has increased, so now you have to decrease your exposure by 2 stops.
Your Current Settings:
ISO: 200
Aperture: 2.8
Shutter Speed: 1/400
New Camera Settings:
ISO: ___
Aperture: ___
Shutter Speed: ___
2.) You’re shooting for a couple’s engagement shoot. You go from shooting in the shade, to now shooting fully in the evening sun. You need to increase your exposure by 1 stop of light.
Your Current Settings:
ISO: 400
Aperture: 2.8
Shutter Speed: 1/400
New Camera Settings:
ISO: ___
Aperture: ____
Shutter Speed: ____
Answer Key
1.) ISO: 100
Aperture: 2.8
Shutter Speed: 1/200
2.) ISO: 400
Aperture: 2.8
Shutter Speed: 1/200
Keep in mind, there are a number of ways to accomplish these goals of changing your exposure. It all depends on the requirements of the shot, and your creative vision.
Remember these 4 things:
1.) Increasing your ISO will introduce noise into the photo
2.) Your aperture dictates your depth of field or how much of your image is in focus
3.) Your shutter speed will dictate whether you’re able to cleanly freeze an image or whether you get a blurring effect in your image.
4.) Enjoy your photographical journey.
~ Stay warm.
dc